Friday, August 27, 2010

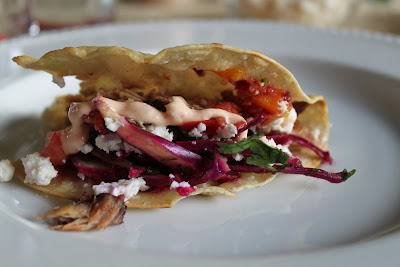
Rib Tacos with Cherry Salsa and Chipotle Cream


Sometimes I over estimate how much people will actually eat.

The last trip we took to northern Michigan I packed 6 slabs of ribs. To feed six people.

Needless to say, I came home with 3 slabs. I had to give some of it away but after eating ribs one night...my husband politely declined ribs for the rest of the week...until I decided to disguise them!

I love tacos and these were no exception. These things were divine!

The cherry in the salsa, the smoky chipotle cream and the crunch from the cabbage, really pulls these things together!


Pork Tacos with Cherry Salsa and Chipotle Cream

Recipe by: Cafe Coco


Ingredients:

2 cups left over rib meat

4-6 corn tortilla shells

1/4 cup cojita cheese crumbled (or feta if you can’t find it)

Canola oil


Cabbage Slaw:

1 cup red cabbage

2 tablespoons fresh cilantro, finely chopped

1 tablespoon fresh lime juice

2 tablespoons olive oil


Salsa

1/2 yellow pepper, chopped

1/2 small onion, finely chopped

3-4 tomatoes, cut into large chunks

1 jalapeno, finely chopped

1/2 clove fresh garlic, finely chopped

1 cup chopped fresh cherries

1 tablespoon olive oil

1 teaspoon honey

salt/pepper to taste


Chipotle Cream

1 cup non-fat yogurt

1 tablespoon chipotle finely chopped, seeds removed


Directions:

Cabbage Slaw: In a medium sized bowl, whisk lime and olive oil. Mix in cilantro and cabbage


Salsa: Mix all ingredients in a food processor for a few seconds until desired consistency. Season with salt and pepper.


Chipotle cream: Blend ingredients together in a small food processor or blender


Heat heavy bottomed skillet. Add canola oil. Add tortilla. Cook on one side for about 30-60 seconds, flip then fold. Cook on each side for about 1-2 minutes (Keep an eye on it...you want them a little browned and crispy).


Fill each shell with rib meat, cabbage slaw, salsa, cojita cheese, and chipotle cream


Thursday, August 26, 2010

Homemade Yogurt and a Yogurt Maker Review

Cherry Vanilla Bean Yogurt

I received this great Tribest Yo-Life Yogurt maker from the folks at CSN stores last month and I've had fun playing around with it.

I've been wanting to make homemade yogurt for so long...and I just couldn't see myself dealing with the whole heating pad in the oven routine. It was just to sketchy for me. The idea of a yogurt maker is great--because it's a controlled environment...I know that I will have a great (or safe) outcome every time.

The hands on time is very minimal. It's really just the 'wait' time that takes forever. The yogurt maker said 8-12 hours of set time. I checked mine at the 8 hour mark and it just seemed a bit too runny. So I would recommend the full time.

I made my yogurt with organic skim milk, and fat free plain organic yogurt. The yogurt still seemed a bit runny. There could be 2 issues: the skim milk or the fact that I used plain yogurt as a starter rather than a concentrated yogurt starter. (I couldn't find a yogurt starter anywhere). Anyone know where I can get one? I am going to try this once again to see if I can get the yogurt thicker--this time with a 1% milk.


Plain yogurt before draining

I did drain some of the yogurt over paper towel and colander. That seemed to help.

I will say, it was fun playing around with flavors. I added my own vanilla extract, chopped fruit and agave nectar for added sweetness.


Raspberry Vanilla Bean Yogurt with Agave Nectar


I can't wait to make some improvements. My little one should be able to have yogurt in the next few months. I have made all of her baby food so far...and yogurt will be no different! Once I get to that stage I will have to venture into the whole milk sector of course.

My favorite thing about this yogurt maker is that it gives you 7 little glass containers to make the yogurt in. PLUS if you wanted to use your own glass containers (mason jars and such) you can do that too.

Overall, I love the concept of this thing...I just need to figure out if the glitch is caused by the maker or the baker!


Wednesday, August 25, 2010

Fall Off the Bone Ribs


These are quite possibly the best ribs I have ever eaten.

Rewind to the beginning of summer, I was racking my brain trying to think of the perfect fathers day feast. I was tired of the same old burger and dog routine and decided that this year, that just wasn't going to cut it.

I decided on ribs, with only one problem. I didn't know how to make them. I was pretty mediorcre at the grill, and on top of all that, I wasn't really a fan of 'BBQ'. I thought at the very least, the guys (including my husband) would like them and that would be fine with me.

Fast forward the entire summer....these have turned into my new party staple! I have made these so many times. We have traveled to northern Michigan several times this summer for vacation. Everytime I have several slabs of baby back ribs in my cooler, leaving my friends asking for the recipe.

The secret is in the rub. Someone told me, just go get one at the store. Me? BUY a rub? I don't think so. Make it yourself. Chances are, you have all of these items in your pantry anyway.

The other secret? Sear, then bake. Most recipes call for doing this the other way around.

These may take some time...but your hands on time is minimal...which is what THIS mom LOVES!

Fall off the Bone Baby Back Ribs

Recipe derived from: Alton Brown


Ingredients

This works for 2 slabs of baby back ribs

Dry Rub:

  • 8 tablespoons light brown sugar, tightly packed
  • 3 tablespoons kosher salt
  • 1 tablespoon chili powder
  • 1/2 teaspoon ground black pepper
  • 1/2 teaspoon cayenne pepper
  • 1/2 teaspoon Paprika
  • 1/2 teaspoon Old Bay Seasoning
  • 1/2 teaspoon rubbed thyme
  • 1/2 teaspoon onion powder


Directions:

Clean the membrane off the back of the rib slab (or have your butcher do it for you). You can You Tube a video of this if you aren’t sure what it looks like.


Rub the ribs on both sides with the rub. Let ribs come to room temp before grilling.


Get the grill REALLY hot. Sear both sides of the ribs about 3 minutes a side.


Tightly wrap each slab individually in foil and put in a large roasting pan, or baking sheet. (You can stack the ribs if necessary but try your best not to over stack).


Bake at 350 for 1.5 to 2 hours.


Serve!


Leftover ribs? Stay tuned....I've made rib tacos!

Tuesday, August 10, 2010

POM Italian Meringue Buttercream Chocolate Cupcakes


It's been months since I've made cupcakes.

Part because I have little time, and part because I am still working off baby weight. I have zero self control when it comes to cupcakes.

Fortunately though, the folks at POM sent me some POM juice to try in some recipes and I felt I probably shouldn't let them down. Not sure if cupcakes are what they had in mind but I guess we all need something good once in awhile.

These cupcakes are nothing short of amazing. The chocolate cake is rich, decadent, moist. The frosting is rich, creamy, and finishes with a bit of tang from the POM.

I took a few of these to my parenting group--they were definitely a hit. I mean...who doesn't like a cupcake?

Pomegranate is a super fruit--so is it's juice! It has more anti-oxidants than even Acai juice (I say that because that seams to be all the rage these days). Hey I feel better about eating these cupcakes already!! It's really easy to use in recipes, too. I found the best way to use it is to reduce it on the stove. I reduce about 1 cup in a saucepan for about 10-20 min until it reduces down to about 1/2 cup. I then add it to dressings, desserts etc.

For the recipe, click here. Just add 1/4 cup of the reduced POM juice at the end mixing the buttercream. I also added 2 tablespoons of vanilla extract.

For POM ice cream, click here!


Saturday, July 24, 2010

Homemade Halibut Fish Sticks with Pickle Caper Tartar Sauce


Bon Appetit has had my toungue wagging all week with amazing recipes that have not let me down. This recipe was so easy and so quick....perfect for a weeknight (or the weekend...whatever).

I know what you're thinking. Fish sticks? Really?

Really. Let me explain.

This is NO freezer burned, cardboard, bottom feeder, tasting fish sticks....let me assure you. (Sorry Van de Kamps...I'm sure you are really nice people, but I just don't see myself ever eating a frozen fish stick).

Instead these are crispy from panko bread crumbs, and flaky halibut dipped in homemade tartar sauce. Heaven. That's what these are. They are just plain good. Really, really good.

I used my Le Creuset pan for these because it gets really hot and helps get these things get extra crispy.

If you think fish sticks are a great concept, it is. But wait until you move onto the homemade tartar sauce: pickles, capers, lemon zest....sounds good, doesn't it?

I just made a few changes to the tartar sauce. To cut the fat, I used half low-fat mayo and half non-fat Greek yogurt. I also added lemon and lemon zest. To me, when I eat fish, I need lemon.

Check out the recipe at Bon Appetit!

Here is my version of the tartar sauce:

Tartar sauce:
1/4 cup low-fat mayonnaise
1/4 cup nonfat Greek yogurt, such as Fage
1 dill pickle, coarsely chopped, such as McClure's
1 tablespoon pickle juice
1 tablespoon fresh dill, finely chopped
1 tablespoon fresh chives, finely chopped
2 tablespoons fresh lemon juice
1 tablespoon lemon zest

Directions:
Mix together in a medium sized bowl. Refrigerate until ready to use.


Coming soon: HOMEMADE YOGURT!! I know you have probably heard me talk about wanting to make my own in the past. Now I have the chance--plus, I'll even review the product as well! Stay tuned!


Friday, July 23, 2010

Grilled Chicken with Grilled Peaches and Chipotle Peach Sauce


It's amazing what 2 hours on the beach, ALONE, can do for you. For me, I was able to catch up on my Bon Appetit magazines. I don't think I've focused on a single thing for more than 10 minutes since I became a mom. So I made up for lost time....and salivated over every single thing I wanted to make. I was sure to make a mental note of everything I wanted to try.

This was one that caught my eye. Since my husband has been giving chicken the 'stink eye' lately, I was sure this would get the thumbs up.

I didn't really make any changes except for pair it with jasmine rice, and grilled zucchini (I halved my chicken breasts because they were large). Don't be discouraged if it looks too fancy. Fancy does not mean difficult. The dressing took about 5 minutes hands on time. I made it ahead of time so dinner prep was really simple. Start to finish, the meal took about 30 minutes.

For the recipe, click here!

Thursday, July 22, 2010

Rasberry Peach Basil Water


Summer is at it's height in Michigan. We have had so many 90 degree days it makes it hard to get out of the house...and I need to stay hydrated.

I gave up soda a long time ago. If I have one, I consider it a treat, but it's certainly not part of my daily routine to drink. I stick to water but sometimes that gets to be a bit monotonous. Since I'm not a fan of juice (too sugary for me) I'm really running out of choices!

Then, the lightbulb went on. My husband and I take a yearly trip to Calistoga Ranch, where we were married almost 3 years ago. One of our favorite bartenders makes fruit water daily. All he does is takes fruit, blends it, tops it with ice, then fills the jug with water. It's fabulous and refreshing...and it contains no sugar (well except from the fruit itself). I also manage to get a bit of my fruit serving in there, too! I've spent the summer experimenting.

Now, don't expect an 'in your face' flavor here. It's meant to be subtle. But it's definitely the ultimate summer refreshment!


Enjoying our water at the pool!


Raspberry Peach Basil Water
Recipe by: Cafe Coco

Ingredients
1 peach, pealed, pitted and diced
1 cup raspberries
5 basil leaves, muddled
Water/Ice

Directions:
In a blender, blend the peach chunks and rasberries until blended. Add to jug. Top with water and ice. Top with the basil leaves. Stir. Keep it in the refrigerator for up to 2 days. You can continue to top with ice and water.

Tuesday, July 20, 2010

Halibut Fish Tacos with Peach Avocado Salsa


When I became pregnant last year, I had sworn off fish for months. Not by my choosing but of by choice of my woozy stomach. Unfortunately that lasted well past 'fish season' so I missed out on nearly the entire thing. Fortunately though, my normal tastes and appetite have reappeared (probably times 100 these days because I'm nursing). But because of this, the choices I make are so much more important.

While wandering the market near my house, I decided I would make fish tacos. My first choice in the past would have been to make these with mahi mahi, but since I was told it was previously frozen (something that just don't do with fish), I settled on what was delivered and cut that day, halibut. I was skeptical because halibut, while meaty, is very flaky. I worried that it wouldn't really stand up in a fish taco.

I was proved wrong, very wrong. Not only was this the perfect choice, halibut was the perfect accompaniment to the peach and avocado salsa! It gave these fish tacos a very delicate bite!

You've got to try these things! Fish tacos are one of my all time favorite summer meals. It's fresh, it's fast, and it's healthy!

Halibut Fish Tacos with Peach Avocado Salsa
Recipe by: Cafe Coco

Ingredients:
1 lb halibut filet
1/2 avocado, diced
1/2 peach, diced
1 jalapeno, diced
1/2 lime juiced
1 tablespoon cilantro
2 oz. feta cheese
white corn tortillas
salt/pepper
canola oil
olive oil
lime wedges
Greek Yogurt (I use fat free)

To prepare the halibut: pre heat cast iron skillet on grill. Add a few tablespoons of canola oil. Season fish with sea salt or kosher salt and pepper. Drizzle with olive oil. Cook skin side up for 4 minutes. Flip and cook another 4 minutes or until cooked to desired doneness. Cover with foil for a few minutes. Then flake off the meat for the tacos.

To prepare the salsa:
Add avocado, peach, jalapeno, lime juice, and cilantro to a medium bowl. Toss lightly. Season with salt and pepper.

To assemble tacos:
Warm tortillas (I just put mine in the microwave for 10 seconds in a damp paper towel.) Top with halibut, salsa, and feta. Garnish with Greek yogurt and lime wedge.

Friday, July 2, 2010


My husband and I are part of a co-op. Pre-baby I kept my own garden, but after last years poor yeild, we made the decusion that it would be best to let the experts handle growing while I focused my new role on motherhood, instead.

So far it's been great. All I have to do is put the baby in the stroller and walk a few blocks to pick up our share. For anyone not able to plant their own garden, for whatever reason, this certainly is a great alternative. Plus, you support your local farmers.

One of our shares had fresh Michigan strawberries. Whenever I have an abudance of strawberries I try to find creative ways to use them. I love putting berries in a salad because it's a great way to get your greens and your fruit, not to mention it gives the salad a sweet kick.

This strawberry poppyseed salad goes great with any summer main course. I think I served steak, but you could certainly serve it with fish or chicken or whatever you would like!!

You could always buy a poppyseed dressing but after reading the labels I figured it would be easier (not to mention cheaper) to just make it myself. Be careful, read the labels. Some claim to be 'all natural'....only to contain high fructose corn syrup. How is that 'natural' again?


Strawberry Poppyseed Salad with Chevre and Candied Pecans


8 oz. leafy greens or butter lettuce

1/2 cup- 1 cup strawberries, cut up

4 oz chevre cheese

1/2 cup candied pecans, for the recipe, click here.


Poppy seed dressing

1/4 cup white wine vinegar

1/3 cup canola oil

1/4 teaspoon dry mustard or 1/2 teaspoon dijon mustard

2 tablespoons sugar

2 tablespoons poppy seeds

salt/pepper


Directions:

Whisk together vinegar, mustard, and sugar. Slowly drizzle in the oil while whisking. Taste and season with salt and pepper. Add poppy seeds and whisk again. You can also put in a small blender- just add all the ingredients together reserving the poppy seeds for after blending.


Wednesday, May 5, 2010

Tres Leches Cupcakes


Happy Cinco de Mayo!!

I wanted to celebrate this year...with many things. Unfortunately, I was able to only make just one of them. Tres Leches Cupcakes.

The first time I had tres leches cake was the night I went into labor. (No, I don't think it was the cause, rather, a major coincidence!). I loved it so much, I devoured it as if it were going to be my last meal, little did I know, it would be the last I WOULD have for 3 LONG days!

I remember the cake as being tender, and very moist. Heaven.

While on my hunt for a recipe, I pulled out several of my cake books (I think I have about 10). Two of these books had a recipe for tres leches. Martha Stewart's Cupcakes, and Cake Love. I researched both recipes and ended up going with Cake Love's. I think its because it had a ton of ingredients and I felt that if it had that many intricate details--it probably was the best bet. For most, I am sure, MORE ingredients would probably turn you away. Me? I have just about every ingredient imaginable in my pantry. It's a joke at my house that I have so much that if the grocery store doesnt have it...they call me for it.

Anyway, while these were actually pretty easy to make, I must say I was rather unimpressed. Actually, I was really disappointed. The cake turned out DRY and dense. Certainly not someting I look for in a cupcake, much less a cake that is known for being pretty wet in texture. This cake was so dry, it felt like it stuck in my throat. The only tres leches about this would be the 3 glasses of milk I would have to swallow just to get it down! ha! The problem I think was the method--the only milk the cake was actually soaked in was the sweetened condensed milk. Anyone who has worked with sweatened condensed milk knows how sticky it is. It just sat on the top of the cupcake instead of absorbing it. Such a bummer! I may have to try Martha's recipe next time. If anyone has tried it, let me know how it is! Sorry Cake Love, I just don't feel the love for these cupcakes. But I do still heart your frosting recipes! :)

I am not going to post the recipe--If you really want it after my review, email me at detroitfoodexaminer@gmail.com

Happy Cinco de Mayo anyway!


Saturday, April 24, 2010

Chocolate Oatmeal Lactation Cookies

I think these cookies speak for themselves.

A friend recommended these to me after I gave birth to my baby girl in February. I think they work, although they aren't proven, I will use any excuse to eat a baked good.

The great thing about these cookies is that you can exchange many of the ingredients. I like to add chocolate chips, white chocolate chips, cinnamon and walnuts. You can certainly add any dried fruits or any kind of nut that you like. I think they taste a bit like the cake doughnuts I get at the cider mill--it's probably the cinnamon I put in them.

And don't worry--these aren't just for nursing mothers! My husband and father in law equally enjoy them!


The key to the cookies: Brewers yeast, Oatmeal, and Flaxseed Meal. I had a hard time finding the brewers yeast. You can find it in the vitamin section of Whole Foods. I would imagine any health food store would carry it also.


For the recipe, click here.

Alterations: 3/4 cup bittersweet chocolate chips, 1/4 cup white chocolate chips, 1/2 cup chopped walnuts, 1/2 teaspoon cinnamon.

Thursday, April 22, 2010

Chicken Piccata

Lately, my husband hasn't been the biggest fan of chicken. I'm not sure what brought on this new aversion, but I personally love chicken.

I think chicken is one of the most versatile things to create a dish, plus it's an inexpensive purchase at the grocery store. Since I am all about easy these days, I took my inspiration from Ina Garten's Chicken Piccata.

To save myself time and stress I prepped the chicken ahead of time while little "G" took her nap. So when dinner time came along, my hands on time was very minimal--with exception of standing near the stove to flip the chicken.

I pretty much followed Ina's recipe to a "t" with exception of the white wine. We don't drink white wine (only red), so I couldn't see opening a full bottle of white when I knew for sure it would go bad. So I used vermouth instead. Let me tell you, vermouth has been my best friend lately (no...I'm not drinking it). I've been using it to substitute white wine in a ton of dishes and it's worked rather nicely. I also doubled the recipe for the sauce. There just didn't seem to be enough with her recipe.

I served it with baby roasted potatoes* and steamed baby carrots. Turns out, my husband loved it despite his new found dislike for chicken. The bonus: the dish is super easy...with ingredients I always have on hand plus it's pretty impressive looking!

For the recipe, click here!
Alterations: Use vermouth instead of white wine and double the sauce recipe. I also added capers to the sauce. I added chicken/poultry seasoning, salt/pepper, and parsley to the bread crumb mixture.

*The baby roasted potatoes I just washed, and put on a roasting pan with olive oil, salt/pepper and put in the oven at 400 degrees for about an hour.

Monday, April 19, 2010

Strawberry Rhubarb Pie


I must say, I've been lucky to have a baby who takes a 2-3 hour nap in the afternoon. It gives me enough time to cool my jets, throw in about 3 loads of laundry and possibly consider baking something (or prep dinner).

Just after bringing home the baby, Food Network had a pie special that had my toungue wagging. I for one, am not a pie person. I never really cared for it, therefor, I haven't really made many pies! For some reason every pie on this show, I wanted to try. So I printed off most of the recipes and vowed that they would not collect dust.

My husband made a Costco run last week and purchased a huge 5 lb package of strawberries. We eat quite a bit of fruit, but eating 5 lbs of anything in a limited amount of time is pushing it. So when I was leafing through my pie recipes I figured, why not try a strawberry rhubarb pie! I've never prepared rhubarb and I am pretty sure I've never even had a strawberry rhubarb pie. So when I put little G down for her nap I decided to get started. I worked in stages so that if I got interrupted I could work in pieces. Luckily, the filling came together in minutes.

Now when I say, it came together in minutes, I have to admit--I cheated and purchased a pie crust. I've made my own pie crust before, but I do need a bit of practice. And since I have very limited time for just 'practice', I had no other choice but to use the store bought in this case if I was going to get this pie completed during one afternoon. Has anyone ever tried Trader Joe's pie crust?? If you haven't...try it! It's soo good. It tastes homemade and certainly not the cardboard taste of the Pepperidge Farm brand.

Hey, I told you...I have a baby. I'm all into a short cut if it's good!

The verdict? Despite the very 'rustic' look of the pie it was sooo good! (I won't go into details as to why--lets just say I forgot to add something and had to rip off the top and surgically put it back together). The crust was flaky and buttery. I really loved the raw sugar sprinkled on the top. The filling was just the amount of tart and sweet. I couldn't resist and cut into it before my husband got home. He's lucky I didn't eat the entire thing.

I can't believe I never make fruit pies...they are so easy!


For the recipe, click here!

Sunday, April 18, 2010

Shrimp with Cheddar Polenta and Cilantro Pesto


Since I've become a mom, I've learned that I have very limited time to make dinner. (not to mention limited hands!). BUT we still have to eat and I need to put food on the table. So you will probably find many more 'mom inspired' meals around here! (Don't worry, I still hope to keep baking!)

I found this on the "Cuisine at Home" website. I get the magazine and I must say its great. All the recipes are very good, but family friendly, and pretty easy. I love all the step by step photos they provide--I love a good visual!

Speaking of good visuals, can you believe the photo?? My husband actually took it--he's getting better at this every day! And he took it with my new cannon rebel 15mega pixel camera. How is that for a 'push prize'? I love it and I hope it helps enhance the blog!

Anyway, I prepped the shrimp ahead of time and popped them into the refrigerator until my husband got home from work....and the rest of the meal came together in 5 minutes. Yup...5 minutes. How great is that?? The key: buy quick cooking polenta.

I didn't quite follow this recipe for the polenta on this recipe. Follow the package instructions on the quick cooking polenta, I used Colvita 5-minute quick cooking polenta. I added whatever cheese I had in the fridge--a little sharp cheddar and a little parmigiano reggiano. You could use whatever you have on hand.

Good meals DON'T have to take you hours!

Enjoy!

For the shrimp recipe, click here!
-Alterations: Toss ingredients with shrimp. Saute on medium/high heat in a heavy bottomed skillet with olive oil. Cook until pink on one side and flip. This should only take about a minute a side if that. Keep an eye on them. You want them to be in the shape of a C NOT and O. O=overcooked! You don't want that.

For the cheddar polenta recipe, click here!
-Alterations: Use quick cooking polenta. Add whatever cheese you have on hand!

Thursday, March 18, 2010

Cafe Coco's Newest Member


Wondering why I've been absent?

I have very good reason....

This little lady walked into my life and has kept me on my toes ever since. I haven't had time to brush my teeth let alone bake. Not to mention I've been taken off dairy and soy due to a protein intolerance of this sweet angel. (I've snuck a few bites....I know totally sinful but I can't help it). How am I supposed to run a blog without my cherished baked goods???

Giuliana Helene
8lbs 12oz 21 inches long
Born February 21, 2010

I can't wait to get back to baking once I catch up on some sleep! In the meantime--if anyone has dairy and soy suggestions--please let me know--I'm dying for a cookie!

Coco
xo


Friday, February 12, 2010

PAMA Pomegranate Liquor and more cupcakes


Valentine's Day is just around the corner along with my baby's impending birth. (Yes, I'm still waiting.) But if I had my choice in a Valentine's dessert--it would be a cupcake.

I'm a complete cupcake fanatic. There is no question. So when PAMA Pomegranate liquor sent me a press release on these decadent cupcakes from more cupcakes, I was hoping that this baby would make its debut so that I could try these. So far, no such luck.

However, that certainly does not mean the rest of the world cannot enjoy these things. Just look at them--rich dense Belgian dark chocolate cake (my personal favorite), filled with chocolate Valrhona liquor mousse, with a decadent PAMA pomegranate infused buttercream. HELLO?! My mouth is watering just thinking about it. A cupcake mixed with a pomegranate liquor? Um?? You have my attention.

Where can you get your hands on these babies? Apparently you can just order them and they will be sent to your house?! No work necessary. It can't get any easier than that. For $66, 'more cupcakes' will send you a dozen of these little morsels. Check out their website here for details.

I think my next trip to Chicago will have to include a trip to more cupcakes...just look at this place!

Cupcakes just bring back childhood nostalgia, but pair it up with PAMA Pomegranate Liquor and you have one sweet 'adult only' treat.

Happy Valentine's Day!

Homemade Peanut Butter Cups


I've been busy in babyland for the last few months. Between dealing with the holidays, over swollen feet, and setting up a nursery, I haven't taken much time to post. So now that I have finished with all my 'nesting' all I have left is to just wait for this baby to come....

Although I have cooked quite a bit throughout my pregnancy, my baking has fallen to the way side due to uncontrolled water retention! I basically work to get food on the table for dinner and consider that a success.

So when I saw this recipe for homemade peanut butter cups, I just couldn't stop myself! The good news: they are easy and I could sit in a chair while making them! The result: amazing, better than store bought anything, melt in your mouth, treat.

I followed the recipe from Martha exactly; I'm running thin on brain cells these days so the less I have the think the better it is on everyone. My advice, do not skimp on the brand of chocolate. Get the best you can find. I used both toll house chips (because that is what I had left from Christmas and was trying to get them out of my pantry) and I used ghiradelli. There was a big difference in taste. Toll house is just too 'waxy' for me. I used a bittersweet chocolate but you can use milk chocolate or any combination that you prefer.

I will tell you--this recipe makes WAY more than it says. I would say I made nearly 80 cups with the peanut butter mixture. I just needed to melt a bit more chocolate to even it out. I used small candy cups I found at a baking shop.

I took these over to my father in laws house for his birthday, and then the other half I made for my house!

If you are looking for something fun to make for Valentine's Day, these are utterly amazing!

Click here for the recipe!

Enjoy!