Wednesday, April 27, 2011

Cherry Almond Scones with Vanilla and Lemon Zest


Up until this weekend, I was unsure if I liked scones.  The last time I made scones I was just beginning to do a lot of 'from scratch' baking.  I was very novice an unsure of how to kneed dough and what it should look like.  As a result, the scones didn't really turn out well.  They were dry and bland.  This could have entirely been based upon the recipe chosen (I would usually get recipes off All Recipes...because it was the only place I knew at the time).  

After watching too much Food Network on a Saturday afternoon, I printed up several recipes I wanted to try.  This one sat in my recipe folder for awhile and I finally decided Easter morning that I would whip these up to go with the quiche I made for Easter brunch.  I originally wanted to make Neiman Marcus' pop overs with strawberry butter but these babies only take 15 minutes in the oven--the popovers would have to take a back seat this time.

The result?  Completely tender, completely flavorful and utterly satisfying.  I loved these scones and would absolutely make them again.  It would be a great basis to add any fruit or nut.  The only thing is, I may check out a few other recipes--these were almost too good so there is a possibility they had a bit more sugar than needed.  Another thing I would change--the size of these things!  The recipe said to cut into 6 pieces but these were way too big.  You could definitely get 12 out of this recipe and serve them with tea.  My only alteration was adding vanilla extract.

Check out the recipe, here.


Tuesday, April 26, 2011

Banana Cream Pie

I was never one to order or make a pie.  After joining TWD (Tuesday's with Dorie) a few years ago, I began to break out of my cake/cookie mold and started to try new things, including pies.  While I need serious work on my pie crust skills, I must say I really enjoy homemade pie!

The last time I made this pie, I made a ton of alterations-adding a peanut butter layer and a chocolate ganache layer.  It was SOO good but I wanted to just try making a simple version as I was already tackling a few other desserts for Easter.

I made sure I read my notes from the last time I made this--I had a bit of trouble with the custard layer curdling on me.  This time, I was greatly prepared for this and as soon as this started to remotely bubble, I yanked it off the stove as quick as possible and ran it through a sieve over a clean cool bowl.  The custard was a complete success!  I was very pleased with the taste of the cinnamon!   One shortcut I had to make--the pie crust.  I bought a pie crust at Trader Joe; it is very close to homemade if you are in a pinch.  I will say, this pie was excellent...but would have been perfect had I made my own crust.

Click here for the recipe, I followed it to a T with exception of the pie crust.

For my alternative version with peanut butter and chocolate ganache, click here.


Monday, April 25, 2011

Rack of Lamb with Mint, Golden Raisins and Pine nuts and Greek Yogurt Dip

I have a confession.

I do not like ham, Sam I am.

I'm being serious.  I don't like it at all.  My husband and I would order a ham every year for Easter.   (Lamb is really the more traditional course choice). My father in law would get in line, every year, at the Honeybaked Ham store for all of us.  Bless his heart for doing this.  The last Easter I hosted, the ham just wasn't very good.  And I asked everyone, "Is there a reason we get ham every year?  Does anyone really even like ham?"  I think it was a mixed response of,  "No we don't really care for it," and "We just got ham because that's just what we always did."  End of story....I needed no other reason to make some changes.

My husband's family are wild about lamb over the Christmas holiday.   I make leg of lamb for Christmas with his mom and we make lamb chops for Christmas Eve.  So why not a rack of lamb for Easter?

I've never made an entire rack of lamb, we've always just made single chops.  I must say, this is a welcomed change.  We paired the rack up with a 'relish' topping made of fresh mint, golden raisins, pine nuts, lemon zest and olive oil.  I also had a Greek yogurt dip on the side with fresh mind and shredded cucumber.  All raved over the lamb and its accompaniments.  I think we may have started a grand tradition.  The best part?  It's super easy, quick to prepare, and can all be prepped ahead of time.  Total bonus:  I get to actually enjoy my guests.  There is nothing better than that!

We used this lamb recipe--we seared our lamb racks on the grill until they had grill marks, then put them in a roasting pan in the oven until the thermometer read 135. (About 25-30 minutes).  We also made the pine nut/raisin relish.

Greek Yogurt Dip
16 oz container non-fat Greek Yogurt (I used Trader Joe brand)
1/2 english cucumber, peeled
1 tablespoon fresh mint, chopped fine

Directions:
In a medium sized bowl, add yogurt and mint.  With a box grater, grate the cucumber.  Wrap the cucumber shreds in a paper towel and drain out the liquid.  Add cucumber shreds to yogurt mixture and mix until combined.  Wrap tightly in plastic wrap and store in the refrigerator until ready to serve. You can do this the morning of.  The mint tends to brown after being chopped, so I wouldn't really recommend doing this the day before.  This is great with potatoes also!

We served the lamb with roasted baby potatoes and roasted asparagus.  Both were roasted in a 400 degree oven and mixed with olive oil and salt and pepper.  

Sunday, April 24, 2011

Easter Carrot Cake with Cream Cheese Frosting and Sugar Cookies

Last year, I took Easter off.  The thought of hosting a large group of people at my house while I prepped all week, then cleaned up after all the company, was just not in the cards since my little G was only about 6 weeks old.  This year, I was much more able to handle it all--including making 2 desserts.

From the first Easter I spent with my husbands family, I made carrot cake.  It just seemed like the right thing to do.  The last few years I've strayed from carrot cake and made a Key Lime Tart, which is equally as delicious, however my husband just isn't a huge fan of citrus desserts.  I decided to bring the carrot cake back into the Easter routine (as well as banana cream pie--you will see that on a future post this week).

I've always made the Better Homes and Gardens carrot cake, ever since I FIRST started baking.   In fact, it was one of the first cakes I made for my husband when we first started dating, 7 years ago.  I just wanted to try something new this time to see what was out there.  I've been pulling out my Joy of Cooking book a lot lately and decided I would give their version a try.  I had to change a few things, but overall--the cake got rave reviews.

It's funny.  When you pull out desserts, people get excited.  I think everyone gets excited for food in general, but there is just something about dessert.  When I set the cake on the table, it got a lot of 'oooh's and ahhh's' but when I said, "It's carrot cake", every man at that table said, "OH!  I want a piece of that!" What is it with men and carrot cake?

Overall, I would make this cake again.  It was extremely moist.  When I say, extremely, it was to the point the night before, when I pulled it out of the plastic wrap I stored it in,  that I pushed on the cake and  it seemed somewhat of a wet sponge.  I panicked.  I thought, did I bake it long enough?  I knew that I surely did.  While assembling the cake, I had to level it off a bit and while tasting the pieces of the crumbs I determined that it was just moist.  Really moist.  I omitted the walnuts (I am not a huge fan of nuts in my cake and I have several allergic family and friends with nut/walnut allergies which meant less sharing opportunity), I also omitted the raisins and pineapple.   I think, had I added them, the cake may not have been so overly moist and the layers may have been a lot higher.

This recipe makes 2, 8-inch round cake layers, each about 1-inch in height.  If I made this cake again, I would double the recipe to be able to slice each layer in half to make this a 4 layer cake.

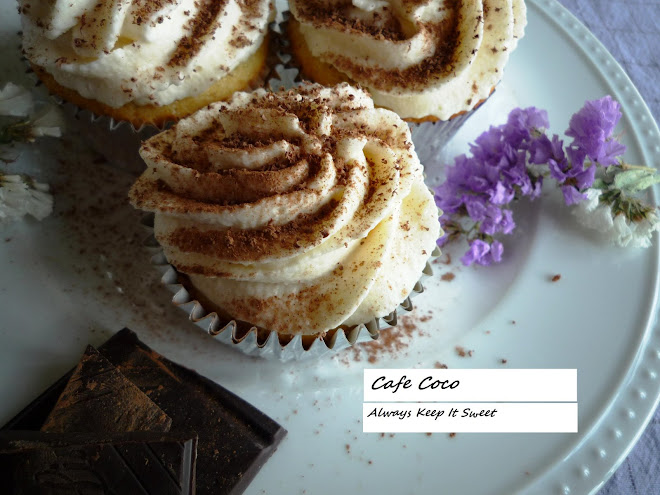
I paired this with Georgetown cupcakes, "Vanilla Buttercream" recipe, which is really cream cheese frosting.


Carrot Cake
Adapted from "Joy of Cooking"


Sift and whisk together in a large bowl:
1 1/2 cups all-purpose flour
1 cup sugar
1 1/2 teaspoons baking soda
1 teaspoon baking powder
1 1/2 teaspoons cinnamon
1/2 teaspoon cloves
1/2 teaspoon freshly ground nutmeg
1/2 teaspoon allspice
1/2 teaspoon salt

Whisk together in another large bowl:
2/3 cup vegetable oil
3 eggs
1 teaspoon vanilla extract

Stir in:
2 cups carrots
(you could also add 1 cup walnuts, 1 cup raisins, and 1/2 cup canned crushed pineapple drained if you wish, just reduce carrots to 1.5 cups)

Directions:
Preheat oven to 350 degrees.  Line two 8-inch round pans with parchment paper.  Spray with cooking spray, then coat each pan with flour and tap out the excess.  Set cake pans on a large baking sheet.

Whisk flour mixture, then add it to the oil/egg mixture slowly.  Fold in carrots (this is where you would add any nuts/raisins etc) and mix until just combined.  Divide equally into the pans.  Bake 25-30 minutes.  I pulled mine out at 25 minutes.

Cream Cheese Frosting, (double this recipe), click here.

For my Cream Cheese Frosting Variation:


Cream Cheese Frosting
Adapted from Georgetown Cupcake
Yield: Enough to generously frost 1, 8-inch layer cake


3/4 cup butter, room temp
12 oz cream cheese, must be room temp (or else you risk curdling your frosting)
2 lb (8 cups) confectioners sugar
2 tablespoons vanilla extract

Directions:
Mix all together until fully combined and fluffy.

For the sugar cookie recipe, click here!
TO ASSEMBLE:
Level cake layers.  Wrap cooled layers in plastic wrap.  Put in freezer for 30 minutes or up to a day (you could do it longer but you compromise the fresh flavor).  Flip 1-layer and place bottom side up.  Frost the top with desired amount of frosting.  Place other layer on top.  Bottom side up.  Frost remainder of cake.  You can pop this in the freezer for 10-minutes in between frosting the layers to firm up the middle.  To place the cookies against the cake, pipe a tablespoon of frosting on the back of the cookie to make it stick.

Thursday, April 21, 2011

Easter Lemon-y Sugar Cookies

My baby cousin, Billy (I can call him my baby cousin because my mom watched him when he was just a baby --sorry Bill!  ;)  ), is serving in the Air Force and will be away from the family for Easter this year.  My aunt wanted to make sure he had a nice care package before the holiday so she called to see if I could help out by making 5 dozen cookies.  Of course, sugar cookies had to be on the list and I decided that I would try my hand at decorating with royal icing instead of my traditional vanilla buttercream to keep them from getting smashed in the mail.  I think I need a bit more practice (who better to practice on than family) but I think a few of these turned out really cute!  It took a lot of will power to not eat all of these.  I know he and his fellow airman/and ladies will enjoy these.

This is my 'go to' sugar cookie these days.  I really like it.  It's sugary, and lemon-y and the perfect combination of crunch and chew.  I've tried several over the years, but I always come back to this one.

Send some cookies to someone you love!

Love ya, Billy!  Thank you for serving our country!  xo


Lemon-y Sugar Cutout Cookies
Recipe derived from: "Fabulous Cookies" by Hilaire Walden
¾ cup unsalted butter, at room temp
1 ¼ cups sugar
1 egg
1 egg yolk
1 teaspoon vanilla extract
Zest of one lemon
Pinch of salt
2 ½ cups all purpose flour
Directions:
1.        In a mixing bowl, cream the butter. Then add the sugar and cream until pale and fluffy.
2.       Add the egg and yolk, one at a time. Then add the vanilla and zest.
3.       Sift the flour and salt mixture and add slowly with the mixer running. Be careful not to over mix. Only mix until the flour is just incorporated.
4.  Decorate as desired!  

Tuesday, April 19, 2011

Antique Book Cake with Yellow Vanilla Bean Cake and Vanilla Buttercream

Quick question:  Does this look like a book?

Hopefully it does!  But it's not!  It's all CAKE!

I look in amazement and smile at this thing every single time I pass it sitting on my counter.  I made this.  

I stared at it for over a day before I finished it (had to 'title' the darn thing) and let's face it, I stink at writing on cakes (if anything blew my cover it was the writing on the cake...).   After a 4 hour cake class with Michelle Bommarito this weekend, I came home with this.  It truly is a work of art.  (This took me WAAY more than 4 hours to complete folks...this does not include baking the cake, making the frosting, or completing the darn thing...)

I must say though, I struggled a bit through the class.  On top of the fact that I work extremely slow:  I, a home baker, and cake novice, practically a no-body at this point, was surrounded by other cake bakers or should I say, cake bussiness/cake decorators/cake artists extraordinaer (someone help me spell this?).  It was humbling at best.

There I was, knowing nearly nothing.  Wondering what mess I got myself into this time and how on earth was I going to pull this off without looking like a total fool.  You know what she said when she came to my work station and saw my Williams Sonoma rolling pin?  "Yea, that rolling pin?  It looks like Susie Homemaker, you have to get rid of that!"  THINK Courtney, THINK..."Ummm", I stammered..."It was a wedding gift".  "  "Baby (she called all of us Baby), get yourself one of these," she say's pointing to a long wooden rolling pin.  I nodded, "I will. I will".

Humor aside, the class was not short of fabulous.  An eye opener to many things other than JUST cake.  Michelle is a true bussiness woman, and I admire her work very much. She worked with everyone on their cakes and spoke quickly in between helping.  It was so much fun and I can't wait to sign up for another class.  I kept thinking, I wonder what it would be like to work in her bakery.  I'd be lucky if she helped me wash her dishes.


Anyway, all you care about is the cake right?

Here we go:  The cake is made of a 9x13 sheet cake.  I carved out the areas to make it look like a book binding, iced the cake, covered it in chocolate fondant, then use tylose mixed with fondant (tylose stiffens up the fondant to the point that makes it dry extremely hard--if you throw it, it will shatter) to make the binding squares.  I used a clay imprinter to make the design on the squares that I borrowed from another student (God bless America).  I then 'painted' the book with clear vanilla extract for sheen.  I used gold disco dust to 'paint' the binding squares then adhered them to the cake.  I wrote on the cake with white royal icing--I know...I need to find a new method- OR- just work on my writing method period.  My Wilton cake instructor always said, "Don't stall when writing on the cake....just keep moving".  It's great advice...now I just need to practice.


Even after this cake sat on my counter for a couple of days...when I cut it...it was still moist.  This is one of the best yellow cake recipes I have used thus far.  Super flavorful, great crumb texture and ultra moist.  I really love the vanilla bean flavor coming through.  It's a surprise, but I haven't made it since my "future sister in laws" birthday 2 years ago!  I think I need to bring this recipe back into my regular rotation because it's the best I have tried thus far.

For the cake recipe, click here.


Saturday, April 16, 2011

Mascarpone Pasta with Peas and Carrots

My 21 pound one-year old could eat her body weight in pasta.  This isn't a joke.

After giving her a very good sized bowl at dinner, she signed "more".  So, I walk over to the stove, and scoop more pasta into her bowl.  A short time later, she signs "more" and deliberately points over to the pot sitting on the stove.  3 bowls later, she starts signing again, and pointing.  I had to draw the line.  I mean, her stomach was going to explode.

I've never had issues with sneaking vegetables in to my little one's diet.  Thankfully, she will eat nearly anything I put in front of her, but this pasta dish could hide nearly anything.  I put chicken in this pasta as well.

The best thing about this?  It is homemade (ie no powder cheese sauce here) and it really takes less than 15 minutes to put together.  I simplified a Giada recipe I loved that just took a bit more time than I wished to spend.  The end result, a very happy baby belly.

Mascarpone Pasta with Peas and Carrots
recipe derived from: Giada De Laurentiis

Ingredients:
3/4 pound small pasta, I used fiori
6 oz mascarpone cheese
6 oz cream cheese
1 cup freshly grated parmesan (not from the can...)
1 cup low sodium or homemade chicken stock
2-3 large carrots, pealed and chopped into bite sized pieces
1 cup frozen peas
salt/pepper

Directions:
Boil two pots of water.  One pasta pot, and one medium sized saucepan.  In the pasta pot, boil the pasta with salted water until soft or el dente (depending on your taste or who you are serving).  Drain most of the water out (reserve about 1/4 cup of pasta water).  Meanwhile, in the medium saucepan, boil the carrots.  Once the carrots are soft, add the frozen peas and cook for about a minute.  Drain.

In the pasta pot with the pasta, add the chicken stock, mascarpone and cream cheese.  Stir until melted and smooth.  Add vegetables and top with parmesan.  Season with salt and pepper.

Friday, April 15, 2011

French Inspired Blue Fondant and White Floral Cake

I decided sometime last week that I was going to start my own baking business.  While I am still working on building a website (I bake cakes...not websites so this will be a work in progress) I have finally decided on a name.  I know...you are all in suspense.  I'll release it when I get my website up.  Besides, I don't want my hard work with an email focus group to go to waste ;).

In order to get my business in order, there are many MANY things I need to learn.  I took a tall cakes class this week to learn the concepts of stacking a tall cake.  I've been scouring the net for weeks for ideas and I couldn't narrow them down until the night before.  Quite convenient really, when I've got a very needy active toddler on my hands.  The fact that she unloaded every single one of my linen drawers in my kitchen was just going to have to happen if I was going to get this thing done.  Quite surprisingly, she enjoyed the cake baking.  She knows the sound of my Kitchen Aid mixer.  So much so, that when she hears it, she is at my ankles... immediately..... waiting for her turn to lick the beaters.  I tell you, it is more gratifying than any cake to watch her do that.
This didn't all run completely smoothly, though.  I made the fondant myself.  Although I have made it before successfully, for some reason, the night before this thing was due, it was giving me H-E --double hockey sticks.  Thankfully, my husband takes great orders and helped resolve the problem.  You can see the fondant is a bit bumpy as a result.  For a test cake....I'm cool with that because it saved me $40 in buying the fondant pre-made.  

I made the flowers out of 3/4 gum paste 1/4 fondant mix.  I realize the flowers don't exactly match.  I needed a smaller cutter but driving out to the cake store was not an option for me.  So I improvised with what I had.   I like both flowers--but they probably belong on separate cakes.  

I LOVE the way the top flower looks.  Very whimsical and classy.  I love the little button details.   It would be perfect for a wedding, anniversary or special birthday.  The smaller daisy ones are more cutesy.  Probably more appropriate for a beach wedding or birthday.  Overall, I like the contrast and will have to work on an improved version of this cake.
I tried a few new recipes with this as well.  Like last time, I was left unimpressed.  Therefore, I am not posting the recipes this time.  Both cakes were too "wedding cake" tasting to me.  Unlike the design of the cake, the cake flavor was dry, and unmemorable.  (Except for my wedding cake of course....I still dream of that thing!)


Saturday, April 9, 2011

Mediterranean Quinoa Salad with Feta, Kalamata Olives and Dill


I love wandering through Whole Foods.  I could spend an afternoon wandering the isles looking at everything.  These days, I don't get much of an opportunity to sit and clog the grocery isles...because I am quickly reminded I have a toddler with me as a cheerio whizzes by my head.

But, while my little one does not share my patience for shopping, there is one thing we both have in common--we both love food.  What could be better than that?

I found this quinoa salad while wandering passed the salad bar at Whole Foods and fell in love with it.  It's no secret Whole Foods is often called "Whole Paycheck".  While I truly believe good food is worth every penny, there are ways you can make good things at home and maybe save a few bucks.

My secret?  Trader Joe!  It's my favorite haven for everything organic...and everything on the cheap.  I purchased the olives, feta and quinoa at Trader Joe.  I bought the dill at another local store.  AND no, TJ's didn't pay me to post this (If TJ's is reading this...feel free to contact me to be your local cheerleader)  I just love the store ;).

If you are unsure of what quinoa is, its a grain.  It is VERY easy to cook, basically boil water, pull the pot off the burner, throw your quinoa in and cover for a few minutes.  Its super easy and SUPER good for you!  I love the texture of it too.

This is one of my favorite 'go to' salads to have in my fridge.  I think you will love it too!

Mediterranean Quinoa Salad with Feta, Kalamata Olives and Dill
Recipe by: Cafe Coco

Ingredients:
1 cup quinoa (cooked according to package instructions)
1 cup feta cheese, crumbled
3/4 cup kalamata olives chopped coarsely
1/4 cup fresh dill, finely chopped
Olive oil, drizzled on the top.  My personal fave?  Katz and Co.

Directions:
Cook quinoa according to package instructions, then cool completely.  Add feta cheese, kalamata olives, and dill.  Mix together.  Drizzle olive oil on top.  Serve!

Friday, April 8, 2011

Dark Chocolate Cake with Dark Chocolate Mousse Filling and Chocolate Italian Meringue Buttercream Chocolate Shavings and Chocolate Covered Strawberries


The winter months are busy with birthdays in my family.  Last year, I had just given birth to my sweet baby G, so my husband had to deal with a bakery bought cake.   After pulling off an extraordinary 1st birthday party for my daughter, I knew my 'husbands cake' would be a simple task to pull off.
This time, I made a slight improvement:  I added homemade chocolate covered strawberries!  I also tried a new chocolate mousse recipe for the filling.  I used this filling because it didn't have raw egg in it, and a few readers have asked me for one.  This is definitely good, and a perfect alternative if you are serving this cake to small children, pregnant women, or anyone that may have a compromised immune system ;).  I have never had an issue with using raw eggs, but sometimes, you have to be extra careful.  I will say, while this is the perfect alternative, the other mousse recipe seems to be a bit more rich, chocolaty, and fluffier.


I used my go to chocolate cake recipe, in 2, 8-inch round pans.  Each layer was sliced in half to make 4 layers.  Each layer was filled with chocolate mousse.  The cake was frosted with Italian Meringue Buttercream, and topped with chocolate shavings and chocolate covered strawberries drizzled with white chocolate.  The end result?  Divine.  Just DIVINE!

Chocolate cake recipe, click here.

Chocolate Italian Meringue Buttercream recipe, click here.


Dark Chocolate Mousse
recipe from Better Homes and Gardens

Ingredients:
8 ounces bittersweet or dark chocolate, coarsely chopped
2 egg yolks, beaten lightly
1/3 cup sugar
1/4 cup water
1 1/2 cups heavy cream

Directions:
In a small heavy bottomed saucepan, add chocolate, eggs, sugar, water, and 1/2 cup heavy cream.  Stir over medium heat until mixture starts to bubble a little along the edges.  Remove from heat and add put in a bowl.  Put bowl over an ice bath.  Cool for about 15-20 minutes.  Stir about every 5 minutes.

Beat remaining 1 cup of heavy cream until soft peaks.  Fold into the cooled chocolate mixture in 3 additions with a rubber spatula.  DO NOT BEAT, this will cause the cream to break down and cause this to become soupy.  Cover with plastic wrap, touching the mousse.  Cool for about 2 hours or up to one day.

*you can use this as a simple dessert and serve with whipped cream and berries or you can fill a cake with it.  It will fill one 8-inch round cake.  It will fill approximately 3 layers.

Thursday, April 7, 2011

Halibut Sandwich and Toasted Couscous Salad

Over the weekend, I was able to catch up on my favorite food network shows.  Giada's struck me (maybe it was because they were all hanging at the beach and there is no warm weather in sight in MI yet!).  After watching, my husband and I were drooling.  I look over at him, and said "Should we make this today?"  He gets up immediately from his seat and says, "Yes, I will get a pen a paper and write you a list".   That's my husband.  Mr. Helpful.

We made everything from the show, I made the kalamata dip (no pictured) first so we could snack on that while we prepped dinner.  The halibut sandwich (sorry the picture is rather dark!) was SO good.  Toasting the ciabatta bread with olive oil and then rubbing a garlic clove on it was probably my favorite part...and smelled SOO good!  The toasty couscous salad was also a play on flavors.  Every bite was different and unexpected.  I will definitely make it all again.  I wasn't a huge fan of the beer though.  I like dark bitter beer.  This was WAAAAAY too sweet.  I suppose if you enjoyed bourbon, you might enjoy the star anise and cinnamon in the beer.

Check out the recipes, here!

Wednesday, April 6, 2011

Apple Blossom Fondant Yellow Cake with Chocolate Buttercream

Last night was my last Class #2 of Wilton.  (I've taken them somewhat out of order...and re-took #2 for a refresher).  I was put under a bit of pressure from my fellow classmate, Dolce by Dana, to step outside the box once again and NOT choose something from the Wilton suggestion book.  Originally I figured I might just take it easy this time but as the weeks drew closer I knew I would have to think of something.   Last time, I made flowers out of gumpaste and it was almost as the sky was the limit (there are just SO many beautiful choices with gumpaste).  But, this time, I felt as though I should probably stick with the flowers shown in class as I REALLY need more practice working with buttercream and royal icing flowers.

So off I went one saturday afternoon, working for several hours on 133 apple blossoms.  One discovery I made while in my Wilton classes 2 years ago was mixing a white icing inside the pink icing bag I was too lazy to clean out--it mixes almost a marshmallow-y swirl hue!  So this time I decided that I would mix the royal icing half way through which made the flowers half white/half mauve.  I really liked the way they turned out!


I realize, this cake actually resembles what really SHOULD be a cherry blossom.  I know.  But after googling "Apple Blossom" the pictures that popped up were cakes that resembled this.  And I only realized this AFTER making 133 apple blossoms.  133.  So I knew that, either way, even though it wouldn't be aesthetically accurate, I was going to go through with my original plan to get the practice drawing trees.


I tried some new recipes this time for experimental sake.  The cake is made of the Yellow Downy Cake from "The Cake Bible", and filled with a Chocolate Buttercream made with egg yolks from the same book and frosted with Italian Meringue Buttercream (well, what I had little of anyway).  Then covered in marshmallow fondant that was colored blue (and then somehow changed itself to purple).  I used 2, 9-inch pans, although next time I would definitely use 8-inch pans as these layers turned out way smaller than expected.

I'm not posting the recipe this time because I wasn't really a fan of the cake itself-I felt it was a bit on the dry side.  Overall...the practice was definitely worth the effort!  I will have to try this cake on a larger stacked scale...sometime soon!