Showing posts with label Breakfast. Show all posts

Wednesday, April 27, 2011

Cherry Almond Scones with Vanilla and Lemon Zest


Up until this weekend, I was unsure if I liked scones.  The last time I made scones I was just beginning to do a lot of 'from scratch' baking.  I was very novice an unsure of how to kneed dough and what it should look like.  As a result, the scones didn't really turn out well.  They were dry and bland.  This could have entirely been based upon the recipe chosen (I would usually get recipes off All Recipes...because it was the only place I knew at the time).  

After watching too much Food Network on a Saturday afternoon, I printed up several recipes I wanted to try.  This one sat in my recipe folder for awhile and I finally decided Easter morning that I would whip these up to go with the quiche I made for Easter brunch.  I originally wanted to make Neiman Marcus' pop overs with strawberry butter but these babies only take 15 minutes in the oven--the popovers would have to take a back seat this time.

The result?  Completely tender, completely flavorful and utterly satisfying.  I loved these scones and would absolutely make them again.  It would be a great basis to add any fruit or nut.  The only thing is, I may check out a few other recipes--these were almost too good so there is a possibility they had a bit more sugar than needed.  Another thing I would change--the size of these things!  The recipe said to cut into 6 pieces but these were way too big.  You could definitely get 12 out of this recipe and serve them with tea.  My only alteration was adding vanilla extract.

Check out the recipe, here.


Sunday, January 9, 2011

Corn and Cheese Stuffed Crepes with Poblano Cream


I used to spend a lot of time watching Food Network. Lately, I haven't had much time for TV, let alone something that would require more than 10 seconds of my attention. Over the holiday break, I caught a few episodes and nearly every show featured breakfast. I love trying new breakfast recipes just to break free from the traditional eggs and toast on Sunday mornings.

This recipe really caught my eye because I LOVE mexican for breakfast. (Okay its probably safe to say that I really love Mexican food in general). This recipe takes a bit of time in the morning but there are several steps and you could probably break them up doing some of them the night before. Each step is very easy and quick to do.


Crepes getting ready to go in the oven


The crepes turned out great! I left out the onions because my husband is allergic but I would definitely keep those in the sauce. I also mixed hot sauce with non fat Greek yogurt instead of sour cream. I also sprinkled with feta on top.

Cooks tip: To char the poblanos put them over the gas stove and turn as needed. Once charred, put them in a sealed plastic bag to steam for 10 minutes.


Charred Poblanos- just scrape the char marks off with a knife


Enjoy!

For the recipe, click here.


Thursday, August 26, 2010

Homemade Yogurt and a Yogurt Maker Review

Cherry Vanilla Bean Yogurt

I received this great Tribest Yo-Life Yogurt maker from the folks at CSN stores last month and I've had fun playing around with it.

I've been wanting to make homemade yogurt for so long...and I just couldn't see myself dealing with the whole heating pad in the oven routine. It was just to sketchy for me. The idea of a yogurt maker is great--because it's a controlled environment...I know that I will have a great (or safe) outcome every time.

The hands on time is very minimal. It's really just the 'wait' time that takes forever. The yogurt maker said 8-12 hours of set time. I checked mine at the 8 hour mark and it just seemed a bit too runny. So I would recommend the full time.

I made my yogurt with organic skim milk, and fat free plain organic yogurt. The yogurt still seemed a bit runny. There could be 2 issues: the skim milk or the fact that I used plain yogurt as a starter rather than a concentrated yogurt starter. (I couldn't find a yogurt starter anywhere). Anyone know where I can get one? I am going to try this once again to see if I can get the yogurt thicker--this time with a 1% milk.


Plain yogurt before draining

I did drain some of the yogurt over paper towel and colander. That seemed to help.

I will say, it was fun playing around with flavors. I added my own vanilla extract, chopped fruit and agave nectar for added sweetness.


Raspberry Vanilla Bean Yogurt with Agave Nectar


I can't wait to make some improvements. My little one should be able to have yogurt in the next few months. I have made all of her baby food so far...and yogurt will be no different! Once I get to that stage I will have to venture into the whole milk sector of course.

My favorite thing about this yogurt maker is that it gives you 7 little glass containers to make the yogurt in. PLUS if you wanted to use your own glass containers (mason jars and such) you can do that too.

Overall, I love the concept of this thing...I just need to figure out if the glitch is caused by the maker or the baker!


Friday, December 18, 2009

Homemade English Muffins


I've been doing a lot of baking lately....not a whole lot of posting.

To prove it...I bring you...English muffins...from scratch.

You may be saying...um...ok...Thomas' makes those and you can buy them in the grocery isle.

But if you have ever had the pleasure of a homemade English muffin, like I did from the Model Bakery in St. Helena, California you too would be on a wild man hunt for something so lovely as a homemade english muffin.


I try not to knock package foods...well all the time...but the truth is...they stink. In fact, most times they are garbage. To prove it, try these and taste them against store bought. It's the difference between eating a piece of heaven and a piece of shoe leather. Its your choice..and we all know...we all get to make our own choices in this country.

But if you are truly looking for something amazing and like nothing you have ever had...make these. I will tell you, they are easy. Mix general ingredients you most likely have at home: flour, water, yeast, milk, etc and you are on your way. The only thing is, you must have a bit of patience as you do with all bread making since it needs rising time. As far as hands on time? Barely any. You measure, mix. Wait. Roll, cut out round shapes. Wait-rise. Bake/fry. Eat. Anyone can do that, wouldnt you say?


I made the entire recipe....it says it yeilds 18. I got less but I made mine a bit bigger than the directions. I also froze a half dozen of these after their last rising. Instead of cooking them, I put them in the freezer on the cookie sheet. Then after they were frozen I wrapped them up in individual freezer bags. Hopefully they will work for another morning!

I ate myself into an English muffin the next few days and decided instead of allowing any of these go to waste...I made them into mini pizzas (like I remembered from Nursury school) and also into little garlic toasts. The sky is the limit....


I used a recipe from Allrecipes. Click here for the recipe. Next time I will have to check out the one from The Bread Biblem still waiting for it's return to my public library.

Enjoy---I know I certainly did.


Sunday, November 22, 2009

Pumpkin Buttermilk Pancakes with Cinnamon Mascarpone


Fall is my favorite time of year for cooking. I love the savory smells that come wafting out of the kitchen, and I love snacking on anything pumpkin.

Yesterday was my baby shower, and after assembling every piece of baby gear and unpacking all the gifts, my husband and I were looking for a nice treat for breakfast. Instead of getting myself together to make it out to breakfast, I decided it would be a good time for me to bust out this humungous can of pumpkin puree I had sitting in my pantry...and make some pumpkin pancakes.

These turned out much better than I thought they would. To be honest, I probably have about 5 pumpkin pancake recipes in my cookbooks (who am I kidding...I'm certain I have more). But the truth is, I can never be bothered in the wee hours of the morning to do any such research especially when I have a serious growling belly. I found this recipe on Allrecipes, but changed it up a bit and then added my own twist. I have to say, these turned out much better than expected and it was certainly the fall treat we had been waiting for.

Pumpkin Spice Pancakes

Recipe derived from Allrecipes


1 cup all-purpose flour

1 tablespoon and 1-1/2 teaspoons brown sugar

1 teaspoon baking powder

1/2 teaspoon baking soda

1/2 teaspoon ground allspice

3/4 teaspoon ground cinnamon

1/4 teaspoon ground ginger

1/4 teaspoon kosher salt

3/4 cup Buttermilk plus 3 tablespoons

1/2 cup pumpkin puree

1/2 egg

1 tablespoon vegetable oil/canola oil


Cinnamon Mascarpone

Recipe by: Cafe Coco


Ingredients:

1/4 cup mascarpone cheese, room temperature

1/4 - 1/2 teaspoon cinnamon


Directions for the pancakes:

  1. In a small bowl, whisk together the flour, sugar, baking powder, baking soda, allspice, cinnamon, ginger, and salt.
  2. In a large bowl, lightly beat the egg. Then add the buttermilk, pumpkin puree, and vegetable oil, and whisk together until combined.
  3. Pour the flour mixture into the pumpkin mixture and gently fold in with a rubber spatula just until blended (you don’t want to over mix). It should be slightly thick and not runny. If the batter is still too thick, just add a tablespoon of buttermilk at a time.
  4. Turn on skillet, once it’s hot, add a tablespoon or more to coat the pan. Cook pancakes about 2 minutes a side--or until brown and crispy.
  5. Serve with a tablespoon of cinnamon mascarpone and maple syrup. Serve immediately.
Directions for the Cinnamon Mascarpone:
1. Mix together cinnamon and mascarpone in a small bowl until combined.


Thursday, October 15, 2009

Cinnamon Banana Nutella Crepes


One of my favorite Sunday past times during the months of May-October is the Farmer's Market. First off, I love supporting our locals. Secondly, I absolutely love fresh fresh fruits and vegetables (I plant my own vegetable garden but growing in 'tubs' just isn't working out so well).

A few Sunday's ago while browsing the market, I was dealing with some serious hunger management issues and made a b-line for the crepe station. I quickly ran down the list of possibilities and settled on Nutella Banana Crepes. I love crepes, but I never in a million years would have thought to put Nutella in them. And this is coming from a girl who polished off an entire jar of Nutella upon returning from Italy this past May in about a week.

Now to be fair, I changed the recipe to make it my own. I make crepes at home quite a bit because they are so simple to make and I just love throwing fruit in them. I literally had breakfast on the table in less than 20 minutes. That includes prep time and half the clean up. I'm mighty slow--so you may be able to get it there in less time.

Enjoy!


**Tip: Don’t get discouraged if your first crepe is a flop, that is pretty common. Discard (or eat it with your fingers at the stove) and start again.

Cinnamon Banana Nutella Crepes

Crepes Recipe:
Recipe derived from Allrecipes.com

1 cup all purpose flour
2 eggs
¾ cup milk
¼ cup water
2 tablespoons unsalted butter, melted
¼ teaspoon kosher salt
Filling Recipe:
2 oz. Cream Cheese
2 tablespoons mascarpone cheese (you can just use cream cheese if that is all you have)
2 tablespoons powdered sugar
1 teaspoon vanilla extract
2-3 Bananas sliced lengthwise
1 tablespoon Nutella hazelnut spread for each crepe

Directions:

For the Crepes:
In a medium sized bowl, lightly beat the eggs with milk and water. Add flour, salt and butter and mix until combined (just until all the lumps are out). The batter will be thin.

Heat a small non-stick skillet on medium high heat (about 8in. in diameter). You need this to be small because the crepe batter is VERY thin and will spread to the end of the pan. Spray with cooking spray. Pour about ¼ cup of batter into the skillet. Spread the batter around in a circular motion. The crepe should pull away from the sides but you can help it a bit with a flexible spatula. Flip once it begins to brown. Brown the other side, and plate the crepe with filling.

For the Filling:
In a mixing bowl, combine all ingredients until well combined.

For Assembly:
Top each crepe with the Nutella first (the warmth will help this spread a bit easier), then spoon on the creme mixture, then the bananas and fold each side up and over. Serve with warmed maple syrup and an extra sprinkling of powdered sugar.


Sunday, February 22, 2009

Homemade Cinnamon Rolls in the Bread Maker

I really love cinnamon rolls. When I was in high school, my girl friend and I would go to the mall every weekend to spend our babysitting money on new clothes. Without fail I always made my way over to the Cinnabun store and ordered a large cinnamon roll with a side of extra frosting. It was my favorite treat.

So for as much as I love cinnamon rolls, I rarely make them (ok, almost never—I think I made them once). Truth be told, making my own dough just scares me. Mainly because of how labor intensive I think it is and about 75% of the time, it doesn’t turn out. Plus, who has patience to wait for something to rise? Not me.

For some reason last night I got up from the couch and decided I was going to make cinnamon rolls. (This type of neurosis is absolutely no surprise from my half sleeping husband). I have been wanting to make these for months and I figured I had everything at my fingertips; I might as well make a trial run and get some practice. It’s all about facing my fears these days.
I used my bread maker for my rolls but you can certainly do this without a bread maker. I have provided directions for both.

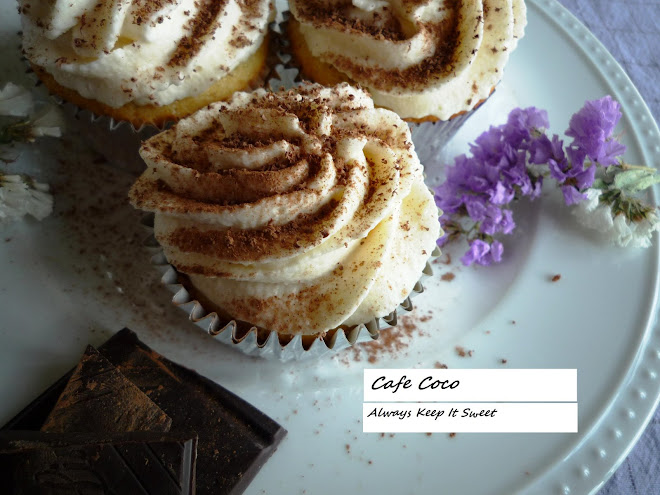
The verdict: These turned out great! Nice and gooey in the middle, spicy cinnamon flavor, and the frosting had a great cream cheese flavor. I was surprised to find that these were not that difficult! I even saved half of them in the freezer for another day! My father-in-law stopped by this morning to sample one and told me they were the best he ever had. I think he is a little biased.

Cinnamon Rolls
Recipe courtesy of Recipe Zaar

Ingredients
1 (1/4 ounce) package dry yeast
1 cup warm milk (I used low fat and that worked just fine)
1/2 cup granulated sugar
1/3 cup unsalted butter
1 teaspoon kosher salt
2 eggs
4 cups all purpose flour
1 teaspoon vanilla

FILLING
1 cup packed brown sugar
2 1/2 tablespoons Saigon cinnamon
1/3 cup unsalted butter, softened

ICING
8 tablespoons unsalted butter
1 1/2 cups confectioners’ sugar
1/4 cup cream cheese
1/2 teaspoon vanilla
1/8 teaspoon salt


Directions

1. Dissolve yeast in the warm milk. Pour into bread maker.

2. Add flour, sugar, eggs, butter, salt, and vanilla to the bread maker. (I added mine in that order you can check with your manufacturer’s instructions—mine didn’t provide any so I just made sure I put the liquid in the bottom since it had the yeast to make sure it was the farthest from the salt). As long as the machine is going to mix right away, it probably does not matter. Set machine on Dough.

3. If you don’t have a bread maker—just mix everything in a large bowl. Knead the dough into a ball with floured hands. Put it in a bowl and cover to let it rise in a warm place for about an hour (it should double in size)

4. Pull risen dough out of bread maker or bowl and roll it out on a lightly floured surface to be about 21x16 and ¼ inch thick. (If your dough is really soupy—mine was….just add more flour and kneed it a few times until you have the consistency that allows you to roll it out.)


5. Make the filling by mixing together the butter, brown sugar, and cinnamon.

6. Spread filling on top of dough evenly.


7. Working from the long end, roll the dough.


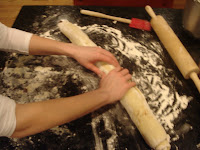
8. Cut into 1 ¾ inch slices and place on a lightly greased baking pan.


9. At this point you can choose to cover with plastic and put in the refrigerator or freezer for later or you can bake them now.


10. Preheat oven to 400, you can put the rolls in the oven to let them rise a bit more while the oven preheats. If the rolls are coming from the refrigerator, you can put the baking dish from the refrigerator right to the preheating oven as well.


11. Bake 10 – 12 minutes. Mine took about 15 because mine came from the refrigerator. They should be somewhat golden brown on the top and gooey in the center.


12. Make frosting while they are in the oven, mix butter, sugar, cream cheese, and vanilla together with a mixer until smooth.


13. Pull rolls out of the oven and top with frosting.

Wednesday, January 21, 2009

Huevos Rancheros and My Favorite Restaurant Breakfast


The weekend will soon be here and it’s time for a great weekend breakfast recipe!

Whenever my husband and I go out to breakfast, one of my favorite things to order is huevos rancheros (I really just like Mexican style breakfast for that matter). But these days, we have been eating in a lot more and I have had to try to figure out how to recreate some of my restaurant favorites.

Making this is rather easy and you can adjust the tastes to your liking. I top mine with different things, depending on what I have in the house. I had left over chipotle chilies, a lonely avocado and a large container of yogurt just begging to be used. I threw in some salsa and black beans and I was well on my way to a great restaurant style breakfast.

Dig in!!

Huevos Rancheros

2 Flour or Corn Tortillas
5 eggs
2 tablespoons milk
¼ cup shredded cheese (you can you a blend or cheddar-whatever you like)
Vegetable oil or Canola oil for cooking the tortillas

Serve along the side: Yogurt/Sour cream, Sliced Avocados, salsa, shredded lettuce, and black beans

Chipotle Cream:
1 teaspoon chipotle chili in adobo sauce, deseeded and diced (these come canned)
½ cup sour cream or plain yogurt
Pinch of salt
-Mix together in a blender or food processor until completely smooth

Avocado Cream:
1 Avocado
½ cup sour cream or plain yogurt
Pinch of salt
-Mix together in a blender or food processor until completely smooth

Directions for Huevos Rancheros:
1. In a large skillet, on medium/high, heat oil and toast the tortillas on each side for about 30 seconds each.
2. In a small bowl whisk together eggs and milk. Scramble eggs on a non-stick skillet adding the cheese towards the end to melt.
3. To assemble: Place tortilla on plate, top with lettuce (if using), then black beans, place the eggs with cheese on top. You can top with any sides you like such as: sour cream, avocado cream, chipotle cream, salsa, cilantro, etc.

Thursday, January 8, 2009

Ricotta Cinnamon Pancakes

As I was laying in bed way early this morning, tossing and turning to get comfortable, I hear my husband sigh.

“Buddy? (he calls me buddy), are you up?”
“Yes.”

“I can’t sleep.”

“I know, me either. Should we [we really means ‘I’] make pancakes?”

This was 5:30 in the morning, and for the two of us who typically don’t crawl [drag ourselves] out of bed until 7am this wasn’t typical.
Luckily, I had some left over ricotta cheese from earlier in the week that I needed to use up along with an egg white…so I basically had all the ingredients I needed to make some early morning ricotta pancakes. It only took me 10 minutes and we had yummy, fluffy blueberry cinnamon ricotta pancakes.

You know what? It was nice sitting down for breakfast before I sent him off to work…we may have to make this a little tradition.

Ricotta Cinnamon Pancakes
Recipe derived from Cooks.com

Ingredients:
¼ lb. Ricotta cheese
1 egg yolk
2 egg whites
1/3 cup milk
¼ cup flour
Pinch salt
½ teaspoon baking powder
¼ teaspoon cinnamon
1 teaspoon vanilla extract

Extras:
Blueberries
Canola Oil
Pure Maple Syrup

Directions:

1. Separate egg yolks from the whites. Whip egg whites to stiff peaks.

2. In a separate bowl, break up the egg yolk and whisk in the ricotta cheese and vanilla extract. Add the flour, baking powder and salt. Make a well and pour in the milk and lightly stir. Add cinnamon, lightly incorporate. Fold in the egg whites.

3. Turn on a griddle to high and heat up oil (I used canola, you can use vegetable if you want). Pour pancakes in ¼ cup fulls and top with blueberries. Brown on each side, turning once.

4. Serve with pure maple syrup, warmed.

Friday, January 2, 2009

Brocolli Cheese Quiche and My New Favorite Brunch Dish

With all the festivities and people at my house, I needed to find an easy breakfast that wouldn’t tie me to my stove. So I decided to make my ‘famous’ broccoli cheese quiche. It’s not really famous, but it’s famous with my family and friends.

I think there is a misrepresentation of quiche as if it’s supposed to be accompanied by china dishes and a tea party. I suppose it still can be, but it really is a great hearty meal that even my father in law raves about it.

The one thing I changed with my quiche is I got rid of all the heavy cream I have seen in so many recipes. I really don’t want all that additional fat so I opted to make it with low fat milk and let me tell you, you cannot taste the difference.

To make it easy on yourself, you can buy a pre-made crust from the store. I do this frequently because I don’t know anyone willing to get up at 5 am to make pastry dough!
Here is a great recipe, just in time for your weekend!

Broccoli Cheese Quiche

Ingredients:
6 eggs
1 ½ cups low fat milk
2 cups cheese (I used cheddar)
1 cup broccoli cooked (I used frozen and it worked fine for me)
Salt/pepper to taste
Store bought pie crust

Directions:
Preheat the oven to 375 degrees

Beat eggs, add milk. Whisk to combine.
Salt and pepper the mixture and add it to the pie crust. Don’t worry about defrosting t he pie crust, go ahead and use it still frozen if you purchased the crust already molded into the pan.

Add cheese and broccoli.

Cook for 45 minutes to 1 hour.
**Mine took a little over an hour to cook because I used a frozen pie crust and the broccoli was still frozen when I added it. If all of your ingredients are room temperature, it will probably only take 45 minutes.

It is done when it’s lightly browned on top and it no longer jiggles in the center. Wait a few minutes for the quiche to settle and then slice and serve alongside fruit.
My cheese sinks to the bottom every time! I have tried mixing it in, and adding it last...any suggestions?? It still tastes great! I guess that's all that matters!

Sunday, October 26, 2008

Italian Fried Egg Sandwich with Pesto and Mascarpone Cheese


My favorite day of the week is Sunday. It's the one day of the week that both my husband and I are home and we always make sure that we spend time together. It’s not like we do anything extravagant, it’s really just the simple tasks we enjoy doing together and it usually consists of : Breakfast, the farmers market, running errands, doing yard work, or relaxing on our patio (if the Michigan weather holds up).

We rarely go out to breakfast because we would rather dine in the comforts of our own home: Café Coco. J I will admit, many of the things I make I have tried at restaurants and then I try to re-create those dishes at home.

A few weeks ago, my brother in law and nephew were in town and we met for breakfast at one of our favorite restaurants in town. My husband ordered this sandwich which was one of the specials and I had entrée envy like nobody’s business. I found my hands lingering over to his plate more than once to steal a bite. So I couldn’t WAIT until today, because I was going to make this. I must say…it’s a great way to start a Sunday.

What’s your favorite day of the week?


Italian Fried Egg Sandwich with Pesto and Mascarpone Cheese

Ingredients:
4 Eggs
¼ Cup Mascarpone Cream
1 T Prepared Pesto (Recipe to follow)
4 Slices of ‘crusty’ bread (I used a sourdough Boulé)
Sliced Fontina Cheese
Heirloom Tomato (or any kind of tomato)
Butter
Salt/Pepper


All you need

Directions:
1. Preheat a frying pan for the eggs, and a flat griddle for the bread
2. Mix together the mascarpone cream and pesto

Mixing the pesto and mascarpone. If only you could SMELL this, WOW!
3. Slice tomatoes thin, slice fontina cheese thin (or you can shred it)


Look at the marbling in this heirloom! SO pretty!
4. Butter the bread on one side

5. Start by frying the eggs in one pan. Then, on the griddle put the bread butter side down.
Yes, I am in my slippers....

6. Start topping the bread with the cheese, tomato and pesto spread to get it warm and toasty

7. You can break the yolks if you want or cook them until the yolks are fairly firm. Then fold the eggs on top of each slice.
See how the egg whites fold over?

8. Each sandwich should have 2 eggs, one for each half. If you fold them right, the egg should stay intact when you slice.
9. Enjoy!


Look at that cheese oozing out! mmmmm
Basic Pesto Recipe:
1/3 Cup Toasted Pine Nuts
2 Cups Fresh Basil
1 Clove Garlic, pealed
½ Cup Extra Virgin Olive Oil
½ Cup Parmesan
Salt/Pepper

Directions:
1. In a food processor, put garlic, toasted pine nuts, and basil. Blend until smooth
2. With the food processor still running, slowly drizzle the olive oil in a steady stream.
3. Add cheese, pulse the food processor again to mix it in.
4. Season with Salt and Pepper.
5. You can save this in the freezer in ice cube trays for quick prep later, or you can save in individual containers in the freezer.