Friday, August 27, 2010

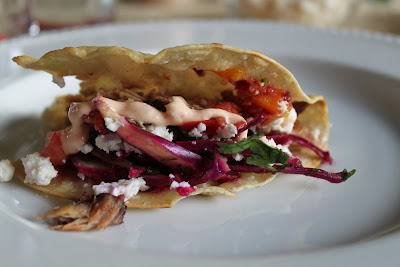
Rib Tacos with Cherry Salsa and Chipotle Cream


Sometimes I over estimate how much people will actually eat.

The last trip we took to northern Michigan I packed 6 slabs of ribs. To feed six people.

Needless to say, I came home with 3 slabs. I had to give some of it away but after eating ribs one night...my husband politely declined ribs for the rest of the week...until I decided to disguise them!

I love tacos and these were no exception. These things were divine!

The cherry in the salsa, the smoky chipotle cream and the crunch from the cabbage, really pulls these things together!


Pork Tacos with Cherry Salsa and Chipotle Cream

Recipe by: Cafe Coco


Ingredients:

2 cups left over rib meat

4-6 corn tortilla shells

1/4 cup cojita cheese crumbled (or feta if you can’t find it)

Canola oil


Cabbage Slaw:

1 cup red cabbage

2 tablespoons fresh cilantro, finely chopped

1 tablespoon fresh lime juice

2 tablespoons olive oil


Salsa

1/2 yellow pepper, chopped

1/2 small onion, finely chopped

3-4 tomatoes, cut into large chunks

1 jalapeno, finely chopped

1/2 clove fresh garlic, finely chopped

1 cup chopped fresh cherries

1 tablespoon olive oil

1 teaspoon honey

salt/pepper to taste


Chipotle Cream

1 cup non-fat yogurt

1 tablespoon chipotle finely chopped, seeds removed


Directions:

Cabbage Slaw: In a medium sized bowl, whisk lime and olive oil. Mix in cilantro and cabbage


Salsa: Mix all ingredients in a food processor for a few seconds until desired consistency. Season with salt and pepper.


Chipotle cream: Blend ingredients together in a small food processor or blender


Heat heavy bottomed skillet. Add canola oil. Add tortilla. Cook on one side for about 30-60 seconds, flip then fold. Cook on each side for about 1-2 minutes (Keep an eye on it...you want them a little browned and crispy).


Fill each shell with rib meat, cabbage slaw, salsa, cojita cheese, and chipotle cream

Thursday, August 26, 2010

Homemade Yogurt and a Yogurt Maker Review

Cherry Vanilla Bean Yogurt

I received this great Tribest Yo-Life Yogurt maker from the folks at CSN stores last month and I've had fun playing around with it.

I've been wanting to make homemade yogurt for so long...and I just couldn't see myself dealing with the whole heating pad in the oven routine. It was just to sketchy for me. The idea of a yogurt maker is great--because it's a controlled environment...I know that I will have a great (or safe) outcome every time.

The hands on time is very minimal. It's really just the 'wait' time that takes forever. The yogurt maker said 8-12 hours of set time. I checked mine at the 8 hour mark and it just seemed a bit too runny. So I would recommend the full time.

I made my yogurt with organic skim milk, and fat free plain organic yogurt. The yogurt still seemed a bit runny. There could be 2 issues: the skim milk or the fact that I used plain yogurt as a starter rather than a concentrated yogurt starter. (I couldn't find a yogurt starter anywhere). Anyone know where I can get one? I am going to try this once again to see if I can get the yogurt thicker--this time with a 1% milk.


Plain yogurt before draining

I did drain some of the yogurt over paper towel and colander. That seemed to help.

I will say, it was fun playing around with flavors. I added my own vanilla extract, chopped fruit and agave nectar for added sweetness.


Raspberry Vanilla Bean Yogurt with Agave Nectar


I can't wait to make some improvements. My little one should be able to have yogurt in the next few months. I have made all of her baby food so far...and yogurt will be no different! Once I get to that stage I will have to venture into the whole milk sector of course.

My favorite thing about this yogurt maker is that it gives you 7 little glass containers to make the yogurt in. PLUS if you wanted to use your own glass containers (mason jars and such) you can do that too.

Overall, I love the concept of this thing...I just need to figure out if the glitch is caused by the maker or the baker!


Wednesday, August 25, 2010

Fall Off the Bone Ribs


These are quite possibly the best ribs I have ever eaten.

Rewind to the beginning of summer, I was racking my brain trying to think of the perfect fathers day feast. I was tired of the same old burger and dog routine and decided that this year, that just wasn't going to cut it.

I decided on ribs, with only one problem. I didn't know how to make them. I was pretty mediorcre at the grill, and on top of all that, I wasn't really a fan of 'BBQ'. I thought at the very least, the guys (including my husband) would like them and that would be fine with me.

Fast forward the entire summer....these have turned into my new party staple! I have made these so many times. We have traveled to northern Michigan several times this summer for vacation. Everytime I have several slabs of baby back ribs in my cooler, leaving my friends asking for the recipe.

The secret is in the rub. Someone told me, just go get one at the store. Me? BUY a rub? I don't think so. Make it yourself. Chances are, you have all of these items in your pantry anyway.

The other secret? Sear, then bake. Most recipes call for doing this the other way around.

These may take some time...but your hands on time is minimal...which is what THIS mom LOVES!

Fall off the Bone Baby Back Ribs

Recipe derived from: Alton Brown


Ingredients

This works for 2 slabs of baby back ribs

Dry Rub:

  • 8 tablespoons light brown sugar, tightly packed
  • 3 tablespoons kosher salt
  • 1 tablespoon chili powder
  • 1/2 teaspoon ground black pepper
  • 1/2 teaspoon cayenne pepper
  • 1/2 teaspoon Paprika
  • 1/2 teaspoon Old Bay Seasoning
  • 1/2 teaspoon rubbed thyme
  • 1/2 teaspoon onion powder


Directions:

Clean the membrane off the back of the rib slab (or have your butcher do it for you). You can You Tube a video of this if you aren’t sure what it looks like.


Rub the ribs on both sides with the rub. Let ribs come to room temp before grilling.


Get the grill REALLY hot. Sear both sides of the ribs about 3 minutes a side.


Tightly wrap each slab individually in foil and put in a large roasting pan, or baking sheet. (You can stack the ribs if necessary but try your best not to over stack).


Bake at 350 for 1.5 to 2 hours.


Serve!


Leftover ribs? Stay tuned....I've made rib tacos!

Tuesday, August 10, 2010

POM Italian Meringue Buttercream Chocolate Cupcakes


It's been months since I've made cupcakes.

Part because I have little time, and part because I am still working off baby weight. I have zero self control when it comes to cupcakes.

Fortunately though, the folks at POM sent me some POM juice to try in some recipes and I felt I probably shouldn't let them down. Not sure if cupcakes are what they had in mind but I guess we all need something good once in awhile.

These cupcakes are nothing short of amazing. The chocolate cake is rich, decadent, moist. The frosting is rich, creamy, and finishes with a bit of tang from the POM.

I took a few of these to my parenting group--they were definitely a hit. I mean...who doesn't like a cupcake?

Pomegranate is a super fruit--so is it's juice! It has more anti-oxidants than even Acai juice (I say that because that seams to be all the rage these days). Hey I feel better about eating these cupcakes already!! It's really easy to use in recipes, too. I found the best way to use it is to reduce it on the stove. I reduce about 1 cup in a saucepan for about 10-20 min until it reduces down to about 1/2 cup. I then add it to dressings, desserts etc.

For the recipe, click here. Just add 1/4 cup of the reduced POM juice at the end mixing the buttercream. I also added 2 tablespoons of vanilla extract.

For POM ice cream, click here!